AWS DynamoDB on Raspberry Pi 4 Running Ubuntu 21.04
What Is Amazon DynamoDB?
Amazon DynamoDB is a fully managed NoSQL database service that provides fast and predictable performance with seamless scalability. With DynamoDB, we can create database tables that can store and retrieve any amount of data and serve any level of request traffic. In addition to the Amazon DynamoDB web service, AWS provides a downloadable version of DynamoDB that we can run on our computers and is perfect for development and testing of our code.
This tutorial will walk you through how to deploy DynamoDB locally on a Raspberry Pi 4 running Ubuntu 21.04 using Docker-Compose version 3. We will also deploy DynamoDB-Admin, which is a GUI (Graphical User Interface) for DynamoDB. It’s a great tool to interact with DynamoDB visually and is built by Aaron Shafovaloff. For more information about Dynamodb-Admin, here is the link to the GitHub repo. And, for more information about Amazon DynamoDB-local Docker image, here is the link to Amazon Documentation.
If you don’t have Docker, Docker-Compose and Portainer installed on your RPI-4, I’d suggest you install them first. Please, refer to this Tutorial.
Installing DynamoDB and DynamoDB-Admin locally using Docker-Compose v3:
There is more than one way to skin a cat (I’ve always wondered why does it have to be a poor cat). I have tried to spin a docker container for DynamoDB on my RPI-4, and then installed the DynamoDB-Admin locally on my RPI-4 (not a container). I have also tried to run a Docker-Compose for DynamoDB and DynamoDB-Admin images using Portainer. However, I had faced some hiccups because the community version of Portainer currently does not support Docker-Compose 3 (as of writing this tutorial 11/14/21).
Although there are multiple ways to install the DynamoDB locally on our RPI-4, I have found the best way that fits my needs is by using Docker-Compose version 3 (by creating a yml file). The following steps will walk you through how to run DynamoDB and DynamoDB-Admin locally using Docker-Compose version 3. This method works great for me. Then, we will interact with DynamoDB using AWS Python SDK - Boto3 and create a table.
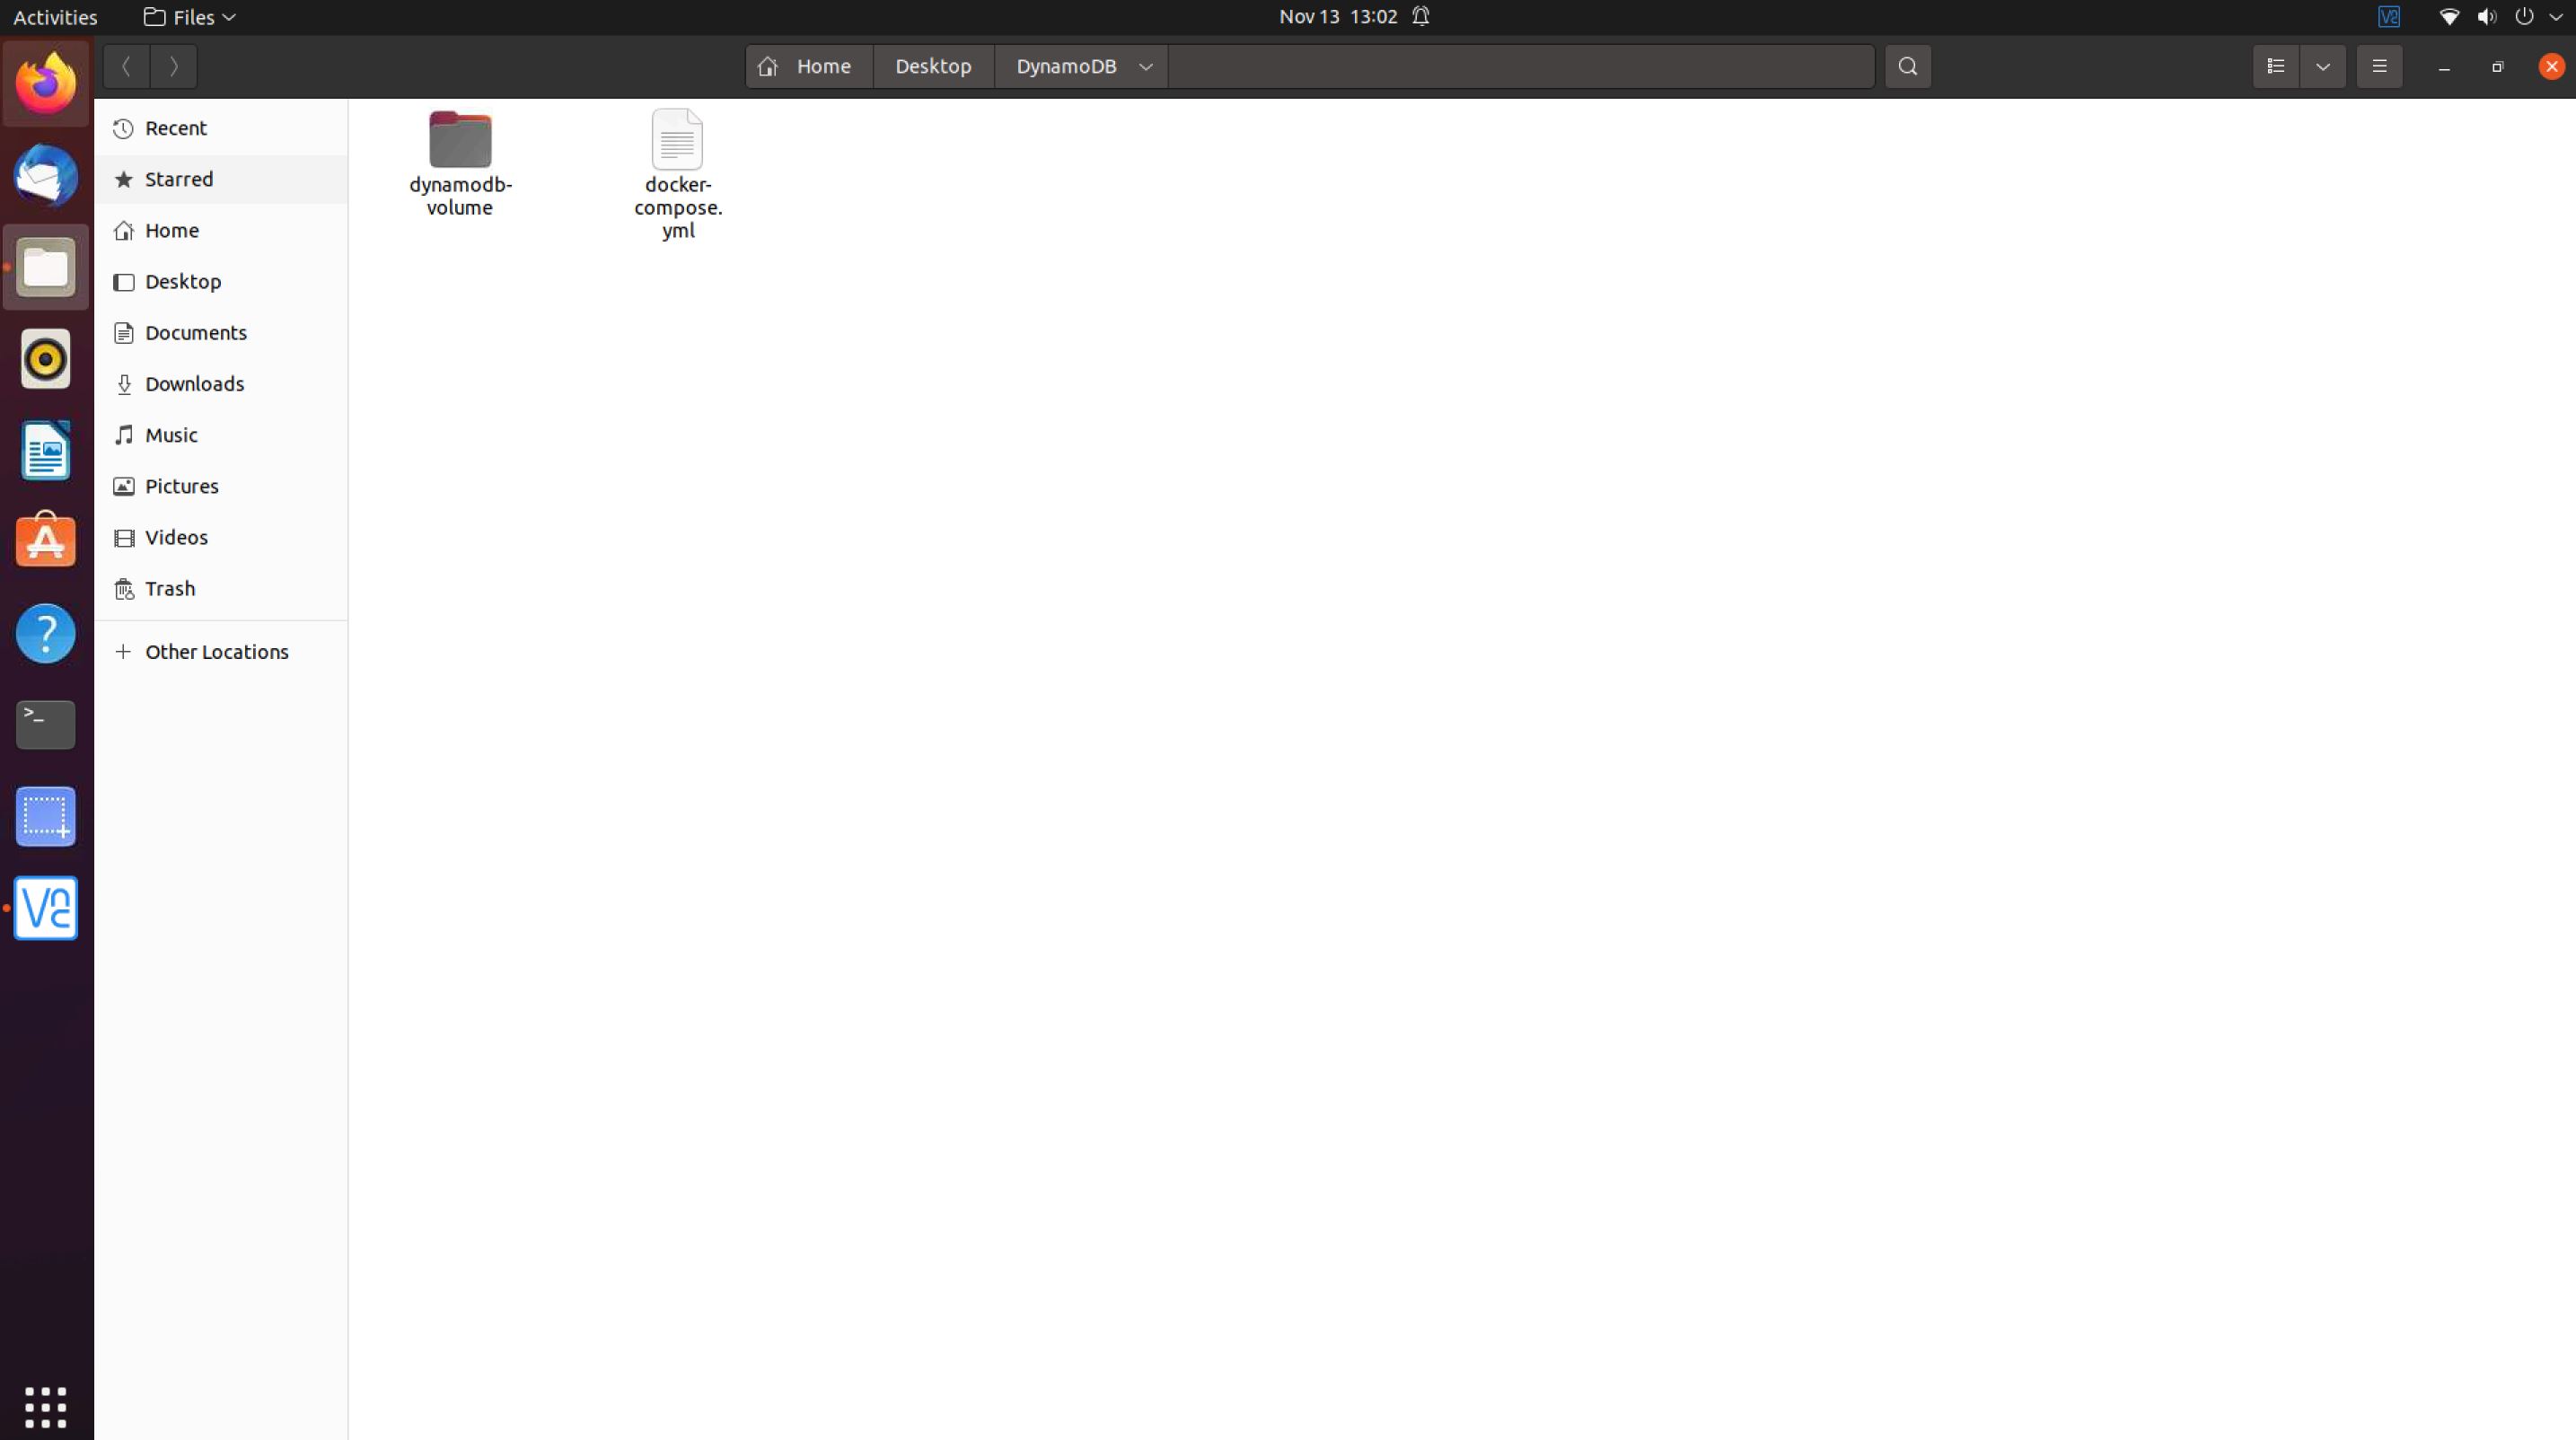
Step 1: Creating Folders
- Create a DynamoDB folder on your RPI-4 Desktop or on any other directory of your choosing. This would be our project folder.
- Create a folder inside the DynamoDB folder and name it dynamodb-volume. We will use this folder to host our DynamoDB database down the road.
- Create a file named docker-compose.yml inside the DynamoDB (not inside the dynamodb-volume). We will run this file to spin our containers later.
You have the option to create these folders and docker-compose file programmatically using the CLI (Command Line Interface) or using the GUI (Graphical User Interface) and any text editor of your choosing. The hierarchy should look like the below image.
Step 2: Composing Docker-Compose.yml File
- Add this text to the Docker-Compose.yml file and read the below discussion prior to saving the file.
version: '3.8'
services:
  dynamodb-local:
    command: "-jar DynamoDBLocal.jar -sharedDb -port 8000 -dbPath ./data"
    image: amazon/dynamodb-local:latest
    container_name: dynamodb-local
    ports:
      - "8000:8000"
    volumes:
      - "/home/pi/Desktop/DynamoDB/dynamodb-volume:/home/dynamodblocal/data"
    working_dir: /home/dynamodblocal
  dynamodb-admin:
    image: omarcloud20/dynamodb-admin-arm64
    container_name: dynamodb-admin
    ports:
      - "8001:8001"
    environment:
      DYNAMO_ENDPOINT: "http://dynamodb-local:8000"
      AWS_REGION: "us-east-1"
      AWS_ACCESS_KEY_ID: local
      AWS_SECRET_ACCESS_KEY: local
    depends_on:
      - dynamodb-local
If you have created the dynamodb-volume folder in a different directory, you may need to point to the directory location in the volumes line: “/home/pi/Desktop/Dynamodb/dynamodb-volume”
Prior to moving to the next step, let’s have a brief discussion about the parameters of this file.
- Although we don’t have to add the command variables, We have added them just in case we need to modify them in the future such as changing the port number.
- To have data persistency and database accessability, we have added a persistent volume (dynamodb-volume). By doing so, we have ensured that our DynamoDB tables won’t get deleted if we delete the DynamoDB container. Moreover, we have access to the database in case we decide to move it to a different host. For my case, it’s ideal and better than creating a Docker volume for it.
- The current DynamoDB-Admin image is amd64 architecture which is incompatible with our RPI-4 arm64 architecture. Therefore, I had to build a RPI-4 compatible image (omarcloud20/dynamodb-admin-arm64) for the DynamoDB-Admin application.
- The environment variables AWS_REGION, AWS_ACCESS_KEY_ID and AWS_SECRET_ACCESS_KEY are required dummy variables to run the Docker-Compose but are not required to be valid AWS keys to access DynamoDB Local.
- By default, the DynamoDB local is listening on port 8000 and the DynamoDB-Admin is on port 8001.
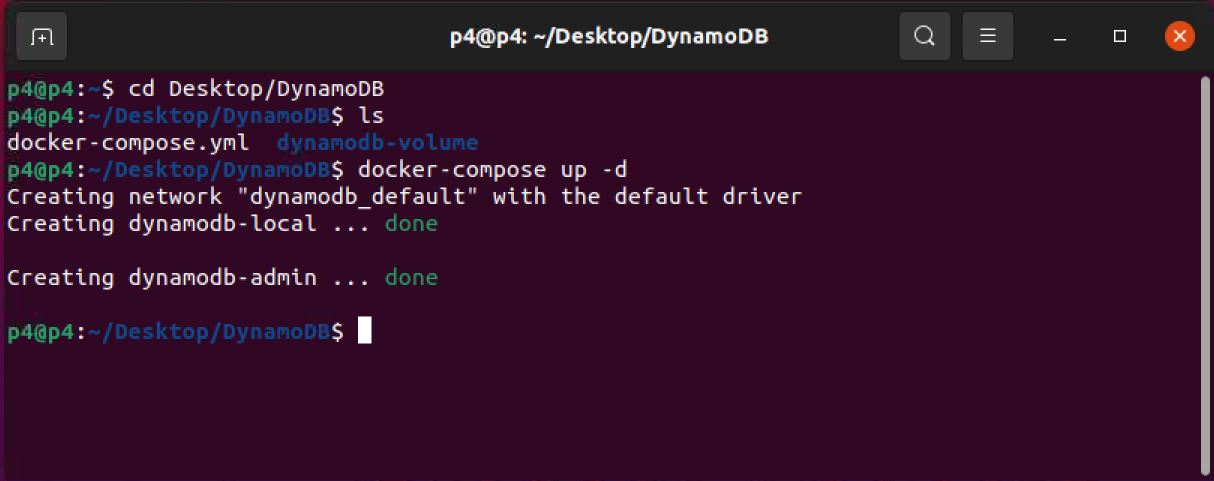
Step 3: Run Docker-Compose
- Let’s cd into the directory where we have saved docker-compose.yml file. In my case, it’s /home/p4/Desktop/DynamoDB.
- Now, let’s run the below command to execute docker-compose. Note, the flag -d is used to keep docker-compose running in the background.
docker-compose up -d
Step 4: Access DynamoDB-Admin UI
- Let’s open a browser on the RPI-4 and type in http://localhost:8001, we should be able to see the DynamoDB-Admin UI. We could also access the DynamoDB-Admin UI from any other device on the same network by typing in the browser the IP address of the RPI-4 and port 8001, http://rpi4-ip-address:8001. For example, http://192.168.1.131:8000

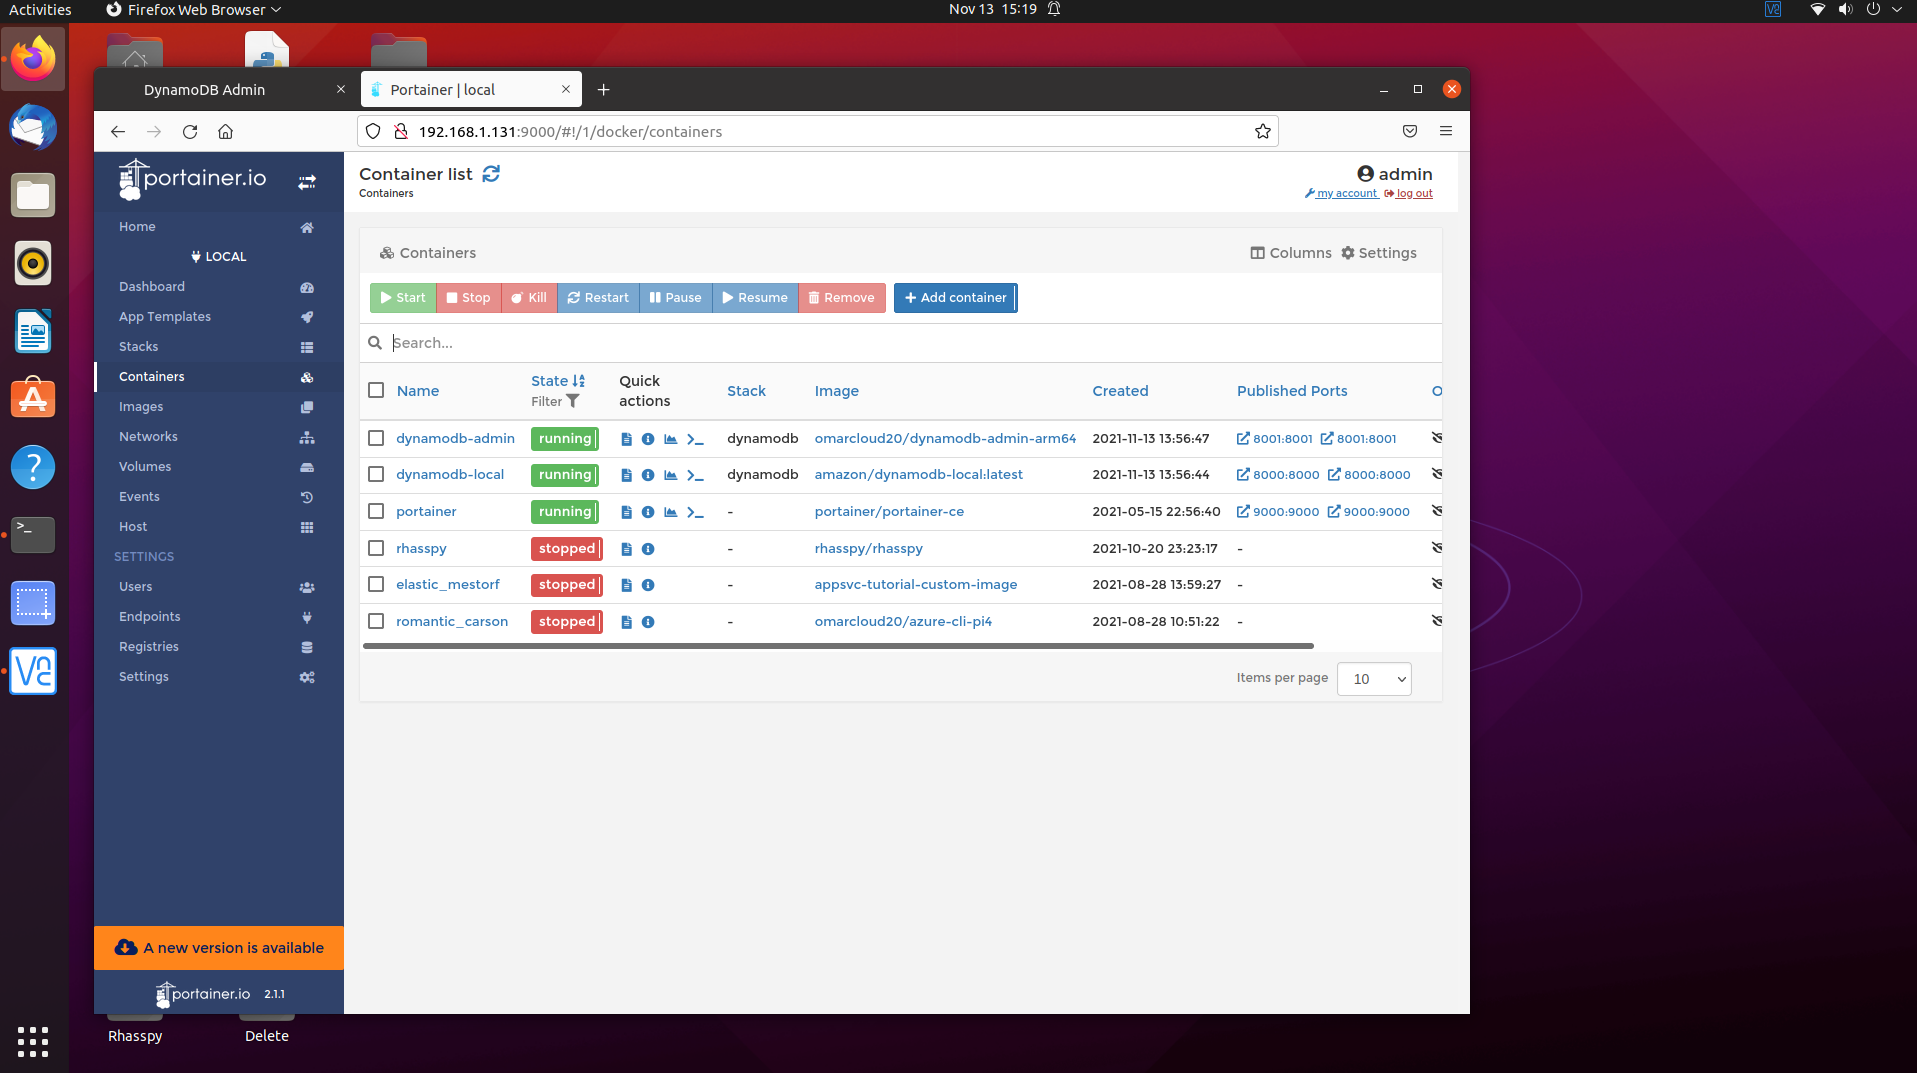
- We could also verify the status of the DynamoDB and DynamoDB-Admin from Portainer as shown below.
Step 5: Install and Configure AWS CLI and Boto3
- Let’s install AWS CLI on our RPI-4:
sudo apt install awscli -y
If you would like to install AWS CLI version 2 instead of version 1, here is the link to Amazon installation document.
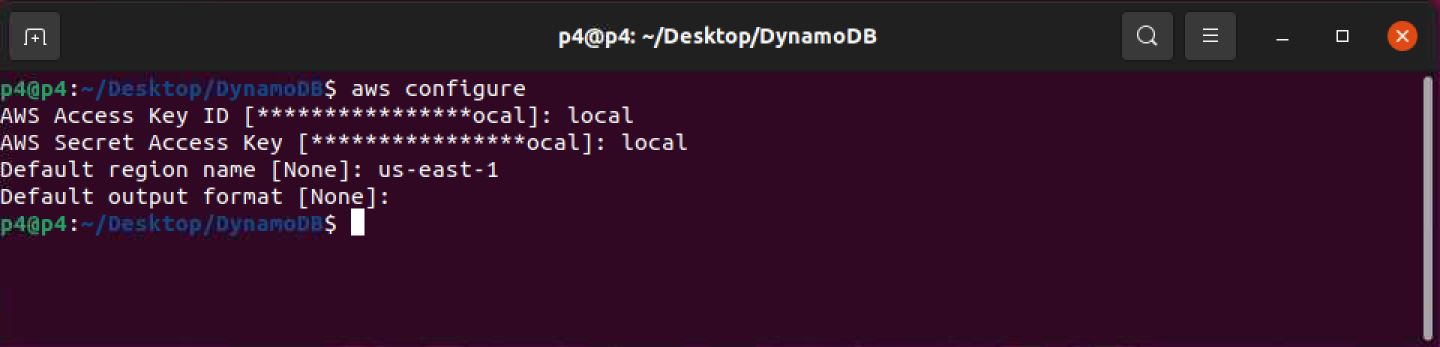
- Now, we need to to configure AWS CLI by running the below command:
aws configure
As part of the configuration process, we will be prompted for the following:
- AWS Access Key ID: type local
- AWS Secret Access Key: type local
- Default region name: type us-east-1
- Default output format: “leave empty and hit enter”
- The AWS SDK for Python is called Boto3. We will use it to write a Python code to interact with our locally hosted DynamoDB. For more information about Boto3. Now, let’s run the following command to install boto3 on our RPI-4.
pip install boto3
or
pip3 install boto3
If you encountered any issues, run this command to find out whether or not you have pip installed: pip --version or pip3 --version. If you don’t have pip installed, please refer to pip installation instructions.
Step 6: Getting Started Developing with Python and DynamoDB
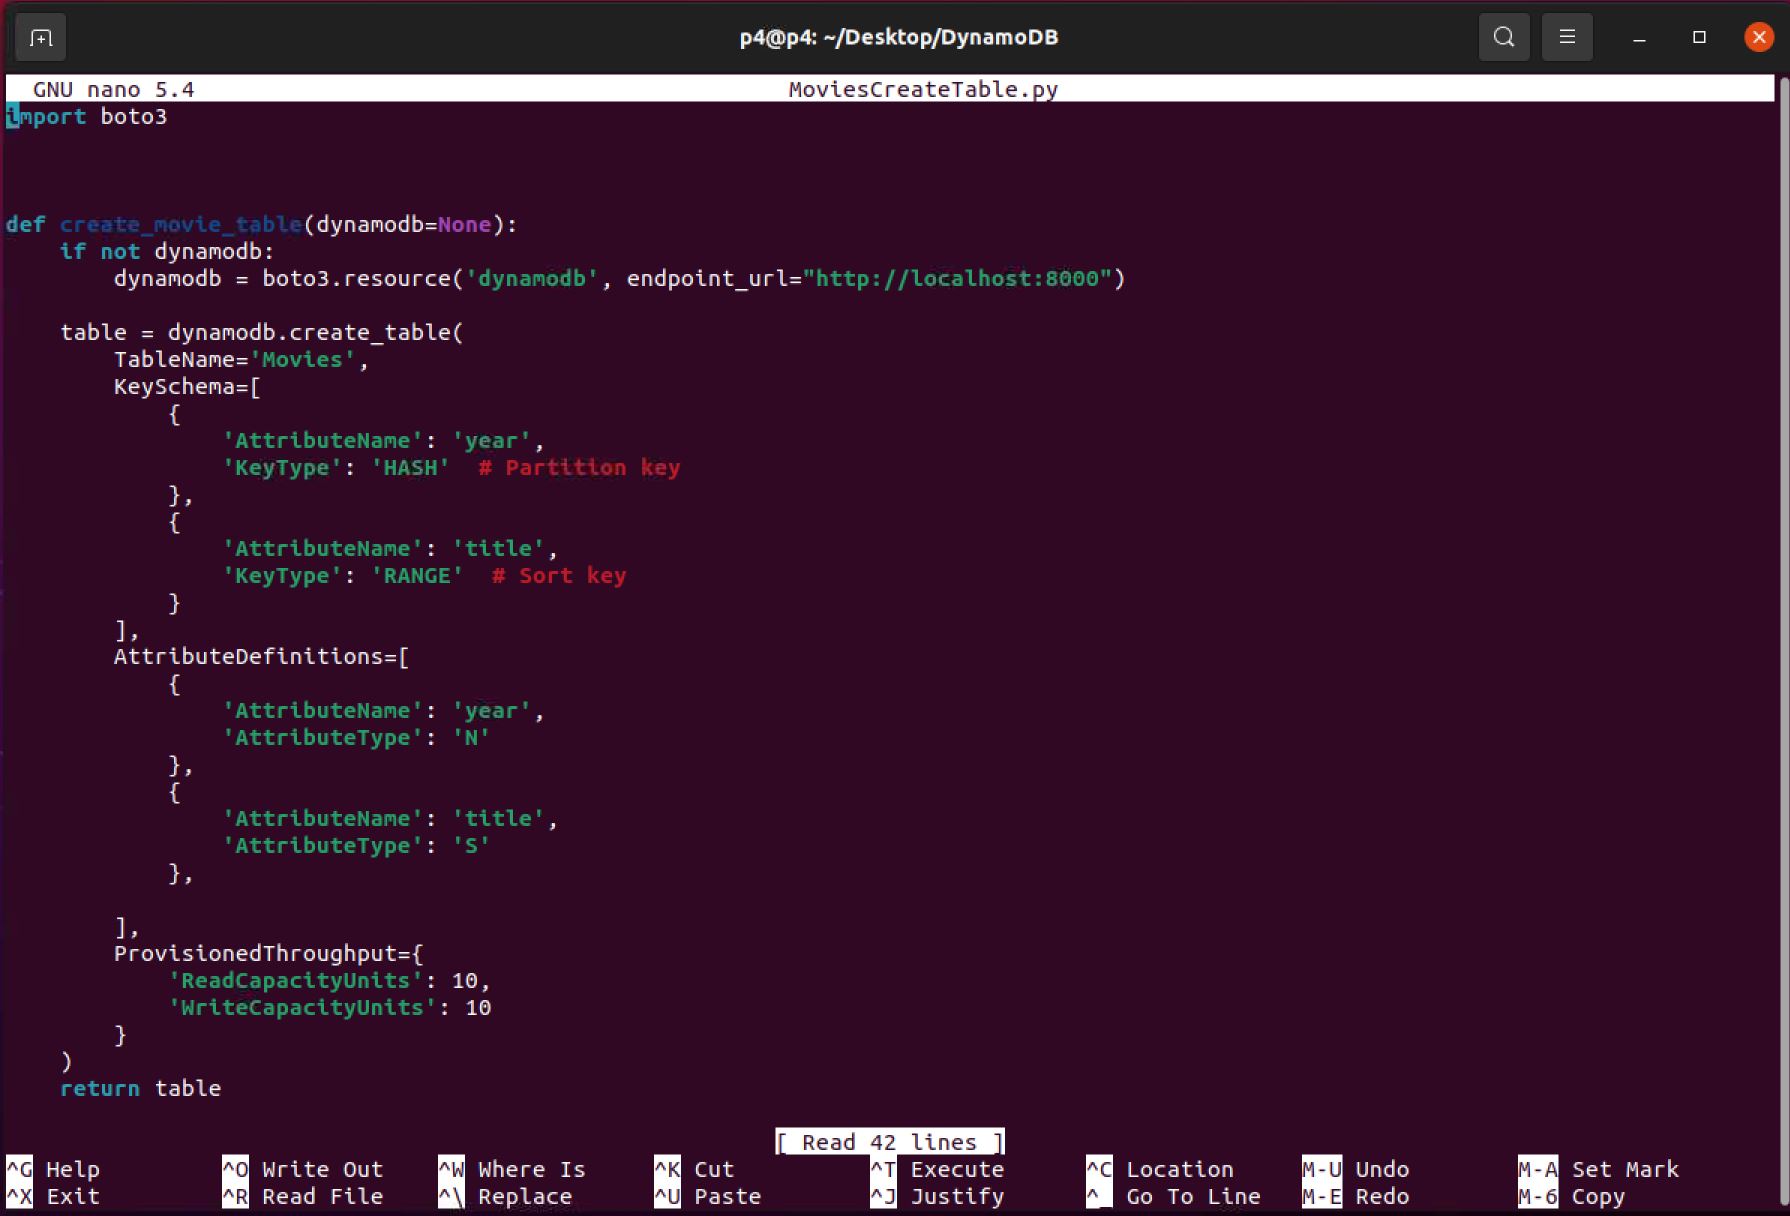
- Let’s write a simple Python code to create a table called Movies. Once again, you have the option to create the Python file using the CLI or the GUI. Let’s use the CLI and cd into our DynamoDB folder. Then, let’s use nano text editor to create a Python file name MoviesCreateTable.py.
nano MoviesCreateTable.py
- We will copy the below code and past it onto nano and save the file by:
- Ctrl + x (control and x)
- type in y
- Finally hit enter
def create_movie_table(dynamodb=None):
    if not dynamodb:
        dynamodb = boto3.resource('dynamodb', endpoint_url="http://localhost:8000")

    table = dynamodb.create_table(
        TableName='Movies',
        KeySchema=[
            {
                'AttributeName': 'year',
                'KeyType': 'HASH'  # Partition key
            },
            {
                'AttributeName': 'title',
                'KeyType': 'RANGE'  # Sort key
            }
        ],
        AttributeDefinitions=[
            {
                'AttributeName': 'year',
                'AttributeType': 'N'
            },
            {
                'AttributeName': 'title',
                'AttributeType': 'S'
            },

        ],
        ProvisionedThroughput={
            'ReadCapacityUnits': 10,
            'WriteCapacityUnits': 10
        }
    )
    return table


if __name__ == '__main__':
    movie_table = create_movie_table()
    print("Table status:", movie_table.table_status)
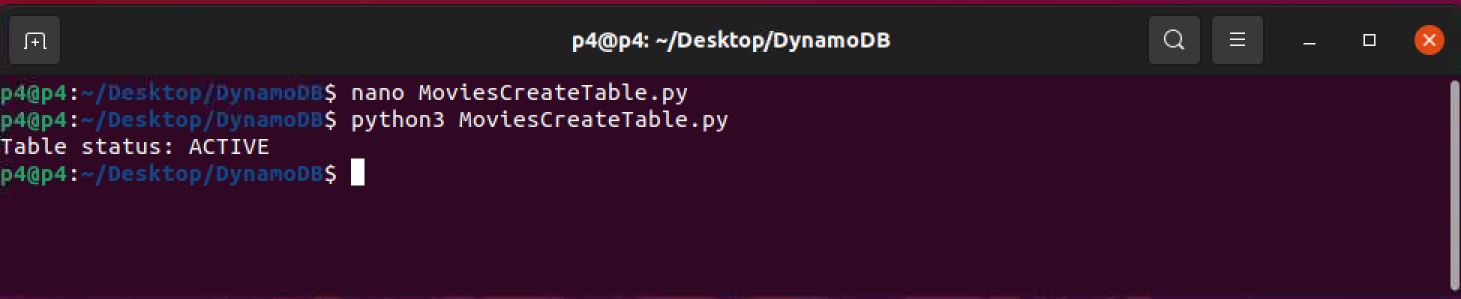
- Now, we are ready to run the Python code using the following the command:
python3 MoviesCreateTable.py
-
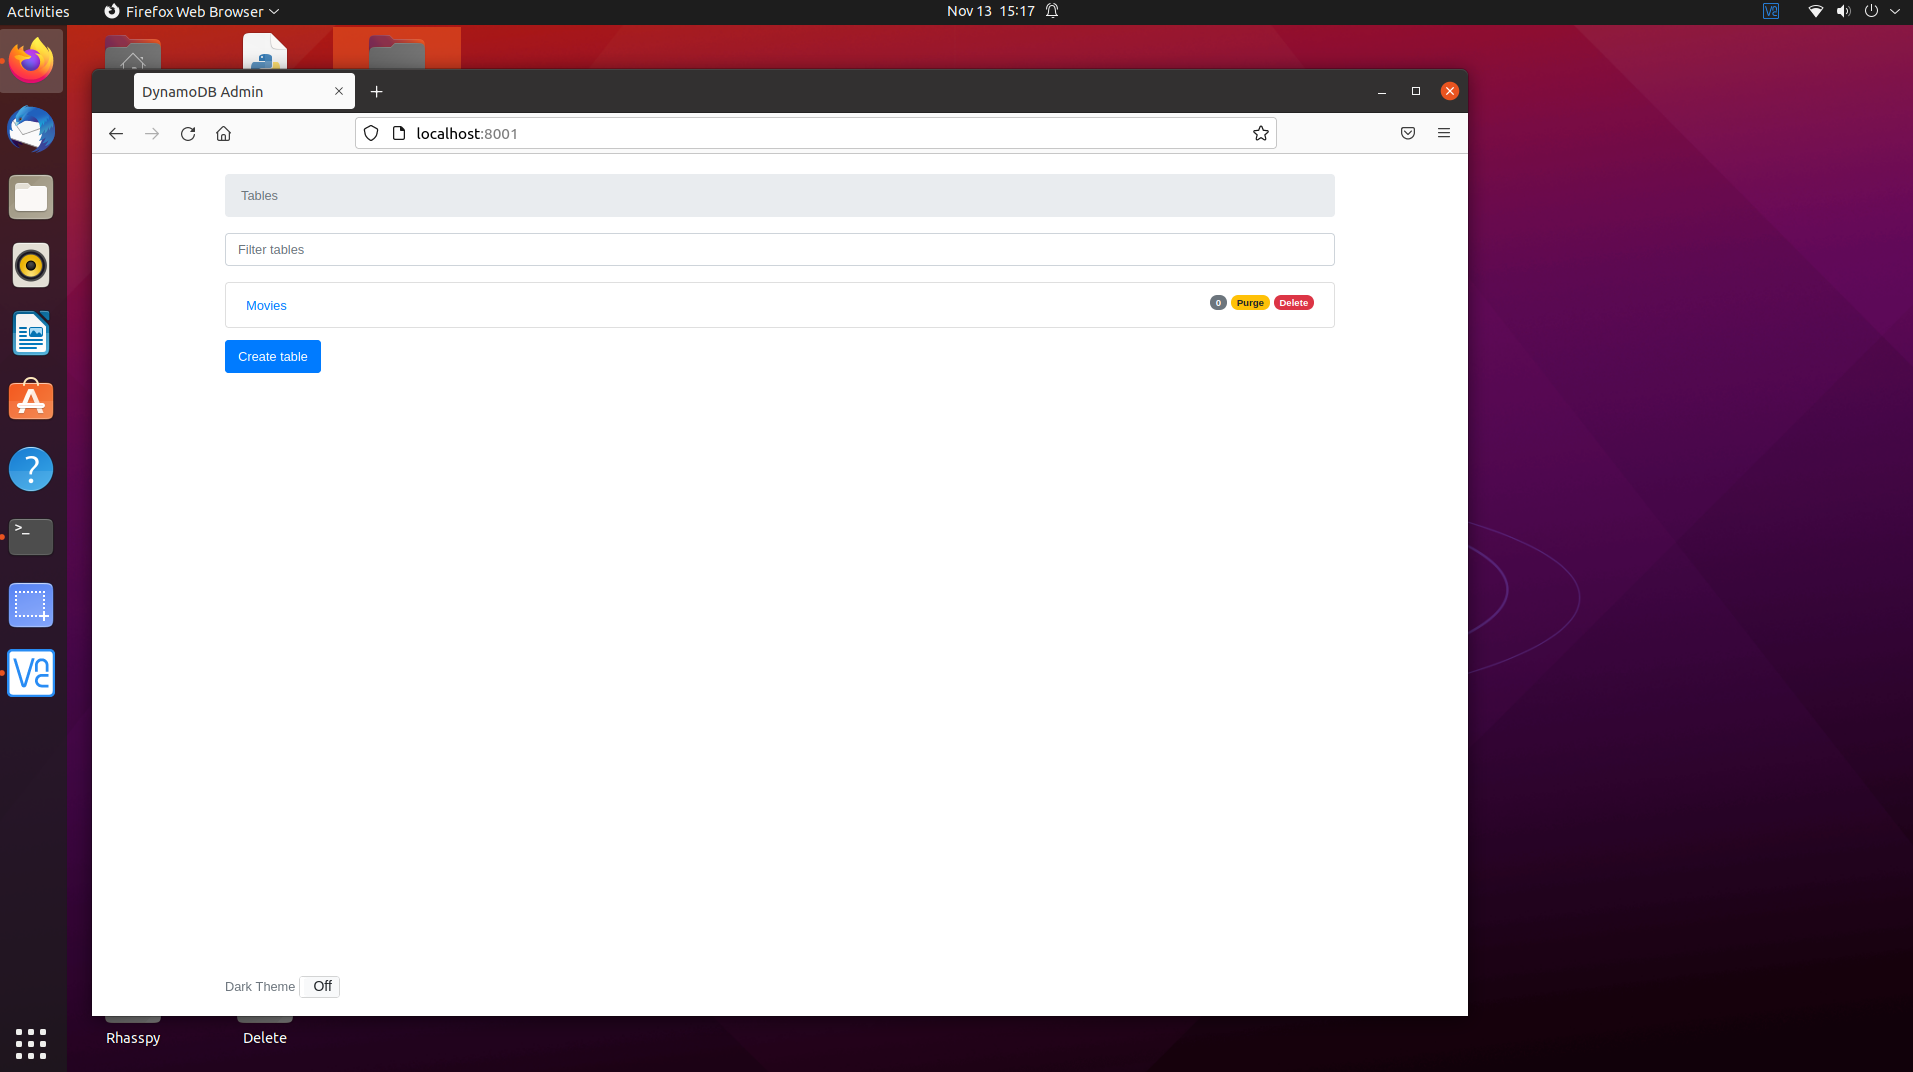
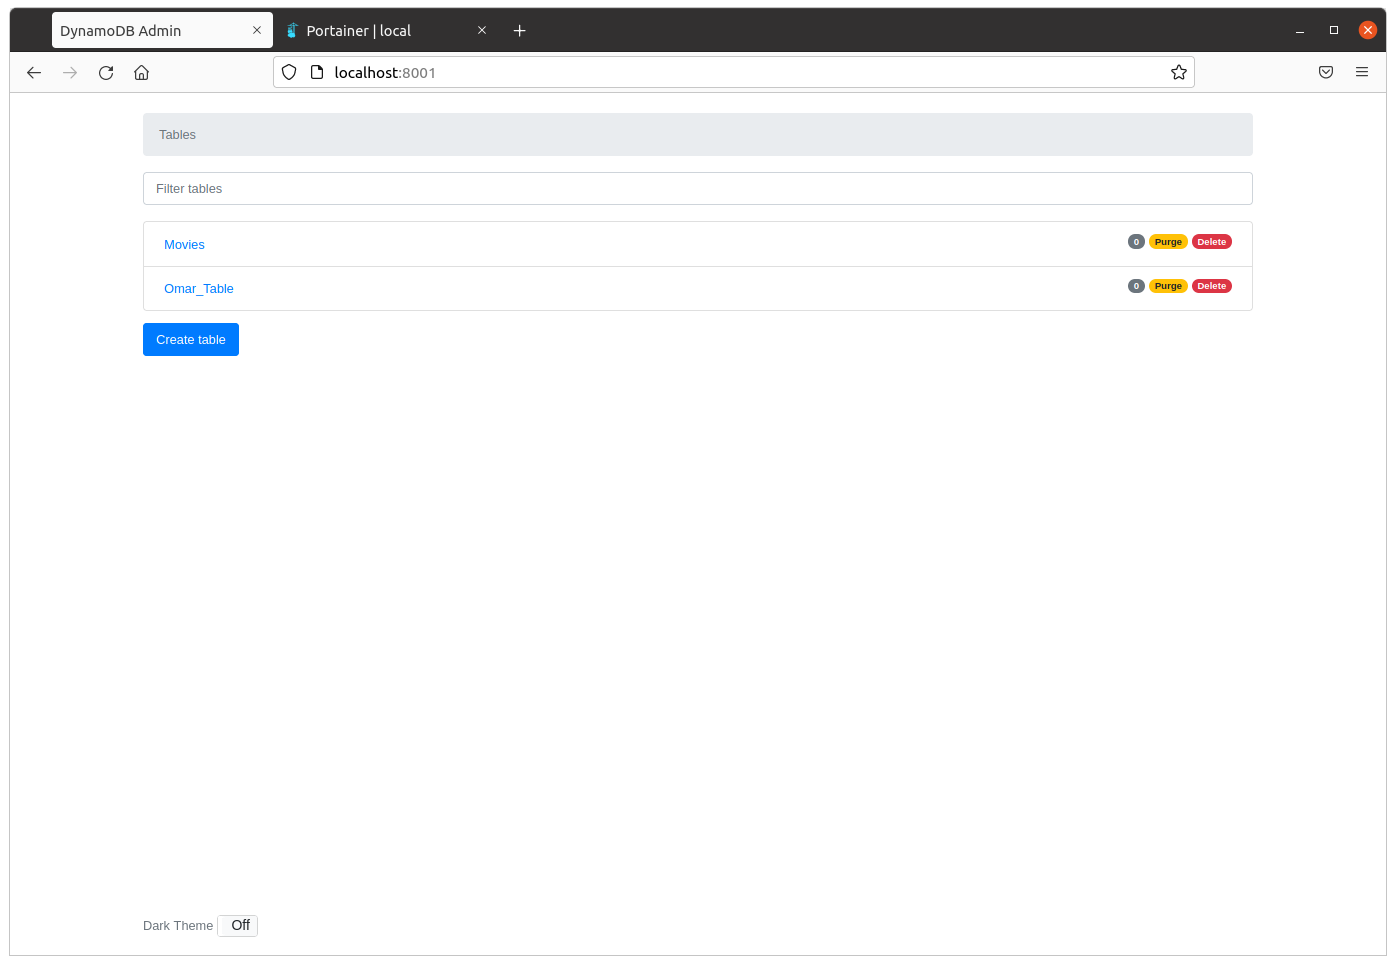
If we refresh the browser, you shall see our newly created table on the DynamoDB-Admin UI as shown below. Hooryah.
-
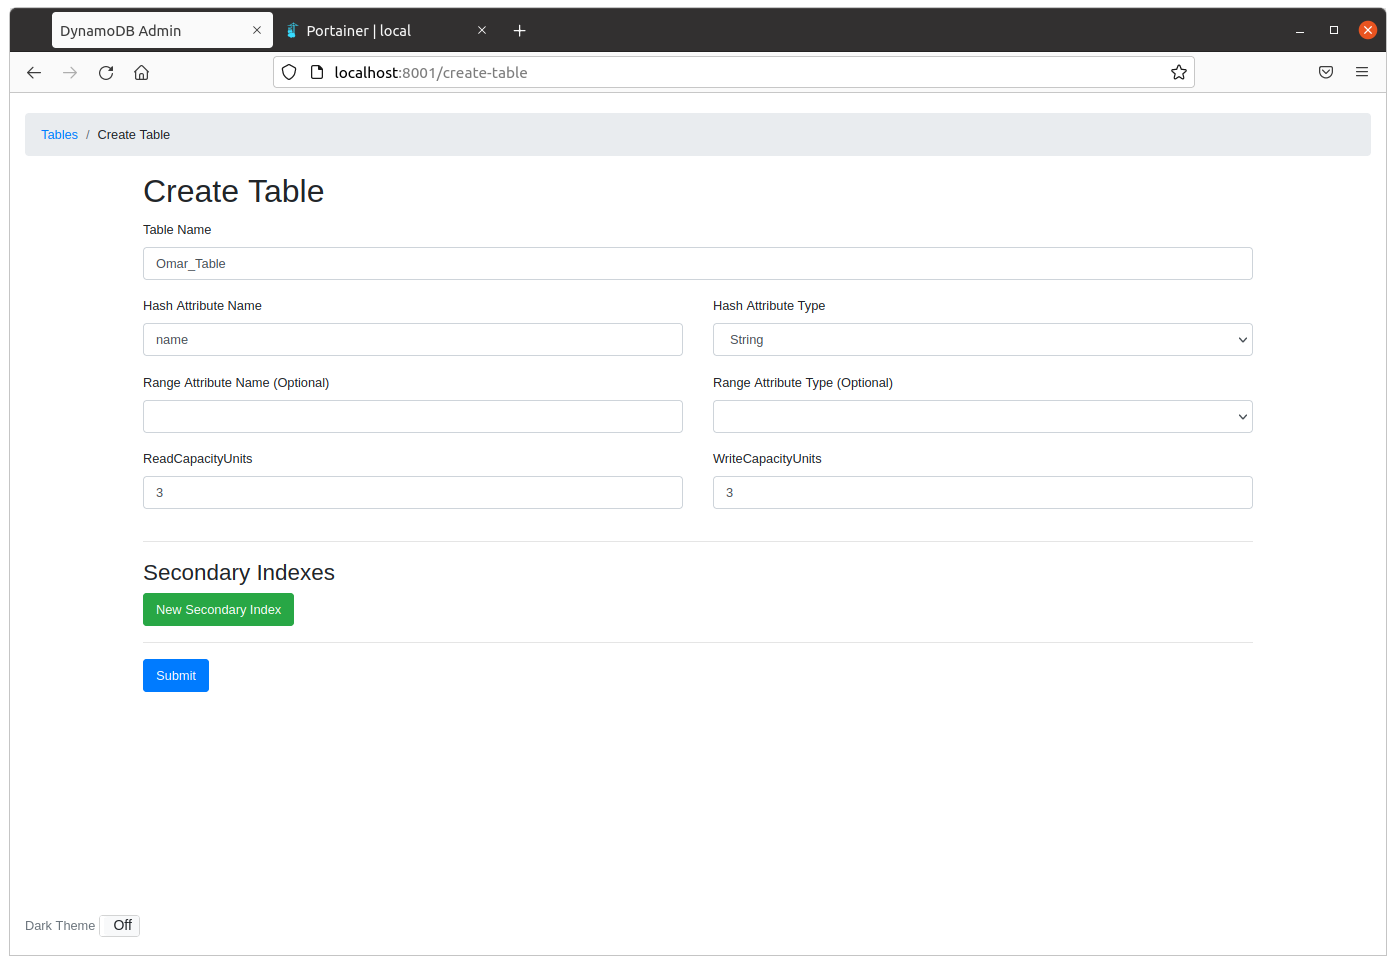
We can also create a DynamoDB table from the DynamoDB-Admin UI. Let’s create one.
- Let’s verify that all tables are stored in our dynamodb-volume. By running the following AWS command, we will get a list of all of our local DynamoDB tables:
aws dynamodb list-tables --endpoint-url http://localhost:8000 --region us-east-1
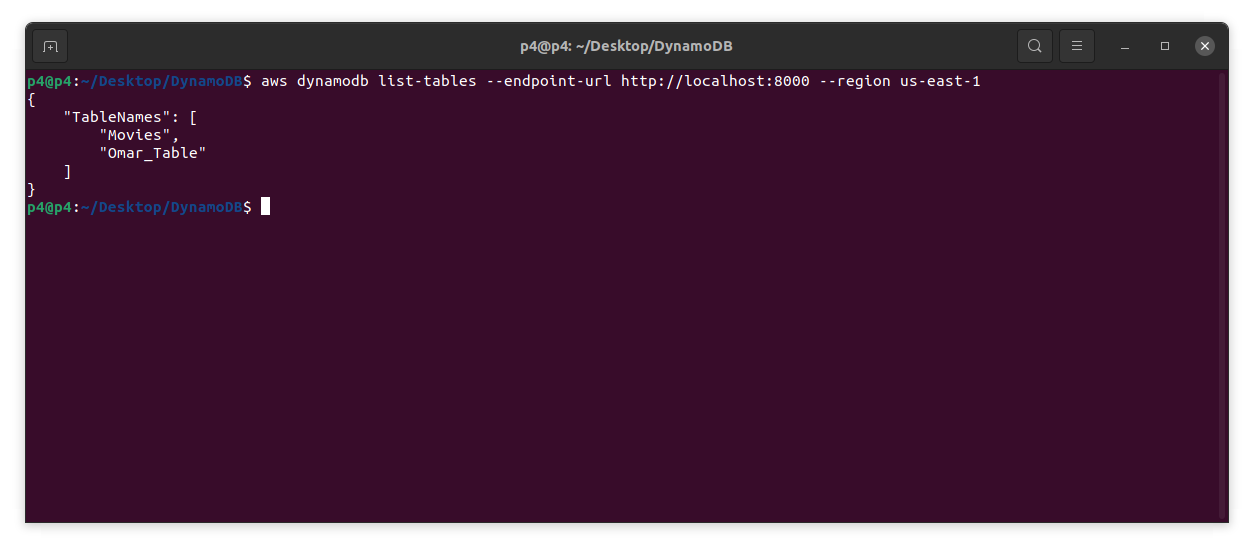
Note that the Movies table was created by running the Python code using boto3 and the Omar_Table was created on the DynamoDB-Admin UI.
For more about developing with Python and DynamoDB such as loading data, query and scan tables, please refer to Amazon documentation.
Conclusion:
By the end of this tutorial, we have successfully configured Docker containers for AWS DynamoDB-local and DynamoDB-Admin application using Docker-Compose version 3 on our RPI 4 running Ubuntu 21.04 OS. We have also created DynamoDB tables using AWS Python SDK (boto3) and DynamoDB-Admin UI. This concludes our tutorial and remember learning never stops, cheers.